Skip to content
English
  • There are no suggestions because the search field is empty.

HMI to PLC network adjustments

The PLC and HMI dashboard are not consistently communicating


Table of Contents:

How to change network settings


To request additional assistance regarding your PLC please use the following link to: SUBMIT A TICKET


Purpose

Set the mini-PC's physical Ethernet adapter to a fixed IPv4 address on the same subnet as the PLC. This prevents the PC address from changing and provides a consistent connection to the PLC at 192.168.2.2.

How to change network settings

(Back to top)

 Network Settings

Device / Setting

Notes

PLC IPv4 address
192.168.X.Y
Do not assign this address to the mini-PC.
Mini-PC IPv4 address
192.168.X.Z
Dedicated address for the mini-PC PLC Ethernet port.
Subnet mask
255.255.255.0
Equivalent prefix length: 24.
Default gateway
Leave blank
Not required for a direct PLC connection.
DNS servers
Leave blank
Not required for a direct PLC connection.

Important: In this SOP, “port” means the mini-PC's Ethernet network adapter.

Before you begin: Record the adapter's existing IPv4 settings. If the mini-PC must later return to a DHCP-managed network, select Obtain an IP address automatically and Obtain DNS server address automatically in the same IPv4 Properties window.

Procedure - Windows Settings

Connect the mini-PC and PLC. Connect an Ethernet cable from the mini-PC Ethernet port directly to the PLC.

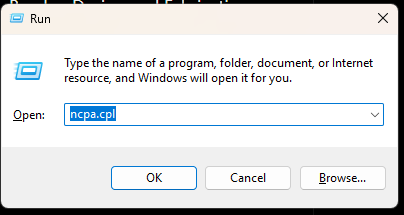
Open the adapter list. Press Windows + R, enter “ncpa.cpl”, and select OK.


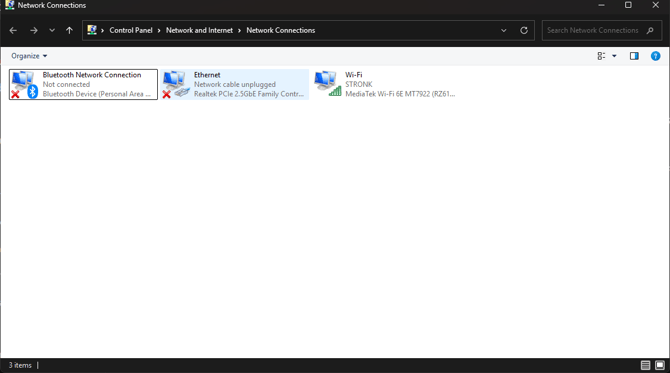
Identify the correct Ethernet adapter. Disconnect and reconnect the cable if necessary; the correct adapter will change between Network cable unplugged and connected.


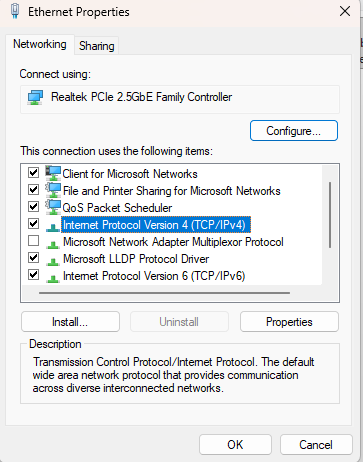
Open IPv4 properties. Right-click the correct Ethernet adapter, select Properties, select Internet Protocol Version 4 (TCP/IPv4), and select Properties.


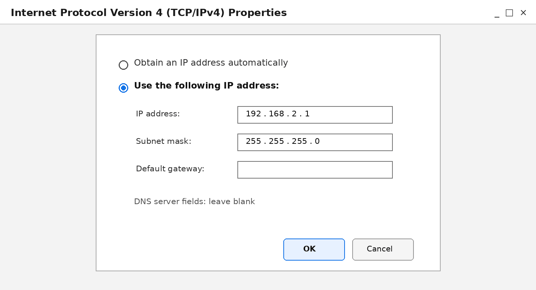
Assign the static address. Select Use the following IP address. Enter IP address 192.168.0.2(hydro unit) 192.168.2.2(air unit) and subnet mask 255.255.255.0. Leave Default gateway and DNS blank.


Save the configuration. Select OK, then Close. If prompted for administrator approval, approve the change.

Confirm the adapter is active. Verify the Ethernet adapter shows Enabled and does not show Network cable unplugged.


The steps and information provided above are intended as general guidelines only. They are not a substitute for professional advice or service. We do not accept any responsibility or liability for any issues, damages, injuries, or losses that may result from following these steps. All electrical work should be performed by a qualified and licensed professional in accordance with local codes and safety regulations.